Fabric-Covered Pencil Holder: A Desk Organizer from a Tin Can
Turn a clean tin can into a desk organizer by measuring and gluing on a fabric cover, folding the top edge over the rim and adding twine and a felt base.

Tutorial at a glance
Materials
- Clean, dry tin can with a smooth rim
- Light woven cotton fabric, pre-washed and pressed
- Craft glue that dries clear
- Flat brush or foam brush
- Flexible tape measure, ruler and pencil
- Fabric scissors
- Twine or ribbon
- Craft felt for the base
- Clips or clothespins
A fabric-covered pencil holder is an empty tin can wrapped in a rectangle of cotton, finished with a folded top edge, a band of twine and a felt base. It needs no sewing: the fabric is measured to the can, cut and glued. The result is a sturdy desk organizer for pencils, pens, scissors or paintbrushes, and three cans of different heights make a matching set.
Most of the work is in the measuring. A rectangle cut by eye usually ends with a gap at the seam or a bulky layer at the rim.
Choose a Safe Can
Any clean food can with straight sides works. The rim is the part to check. A can opened with a smooth-edge opener, which cuts below the rim and lifts the whole top off, leaves a rounded edge. A standard opener cuts inside the rim and can leave a sharp lip or small metal burrs.
Run the back of a spoon, not a finger, around the inside of the rim to feel for snags. If the edge is rough, press any burrs flat with the spoon and cover the rim with a strip of strong cloth tape folded over the edge before you add fabric. If the edge is jagged or the can is dented at the top, recycle it and choose another.
Remove the label, wash the can and dry it completely, inside and out. Glue does not grip a greasy or damp surface, and leftover label adhesive shows through thin fabric as a lump, so rub it away first.
What You Need
- A clean, dry tin can with a smooth rim
- Quilting cotton or a similar light woven fabric, pre-washed and pressed
- Craft glue that dries clear, and a flat brush or foam brush to spread it
- A flexible tape measure, a ruler and a pencil
- Fabric scissors
- Twine or ribbon for the trim
- Craft felt for the base
- Clips or clothespins to hold the rim while the glue sets
These are all part of the basic kit for paper and fabric projects.
Measure and Cut the Fabric
Take two measurements from the can: its height, and its circumference, which is the distance around it. Wrap the tape measure around the middle of the can to find the circumference.
- Fabric width = circumference + 1 in (2.5 cm). The extra gives a 1/2 in (1.3 cm) turned-under edge and a 1/2 in (1.3 cm) overlap at the back seam.
- Fabric height = can height + 3/4 in (2 cm). The extra folds over the rim to the inside.
| Can | Height | Circumference | Cut the fabric |
|---|---|---|---|
| Short | 3 in (7.5 cm) | 10.5 in (26.5 cm) | 11.5 x 3.75 in (29 x 9.5 cm) |
| Medium | 4.5 in (11.5 cm) | 9.5 in (24 cm) | 10.5 x 5.25 in (26.5 x 13.5 cm) |
| Tall | 5.5 in (14 cm) | 12.5 in (32 cm) | 13.5 x 6.25 in (34.5 x 16 cm) |
The table shows examples only. Cans vary, so measure your own and apply the two rules above. Draw the rectangle on the wrong side of the fabric with a ruler and cut along the lines. Fold one short end 1/2 in (1.3 cm) to the wrong side and press it; this folded end goes on top at the seam and hides the raw edge.

Wrap, Fold and Trim
Test the glue on a scrap of your fabric first. Some glues soak through thin cotton and leave a dark patch; if that happens, spread a thinner layer. Brush the glue onto the can rather than the fabric, in a thin, even coat with no blobs.
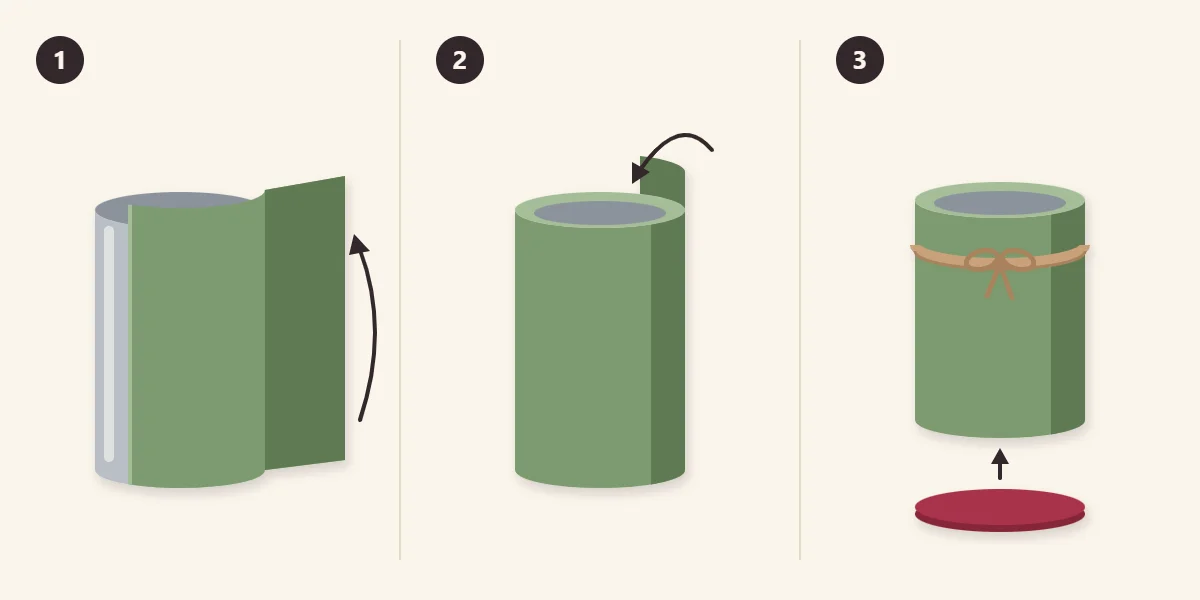
- Wrap the fabric. Line up the bottom edge of the fabric with the bottom of the can, starting with the raw short end. Roll the can along the fabric, smoothing from the middle toward the top and bottom so no air is trapped. Finish with the folded short end on top, glued down over the raw end. This seam is the back of the holder.
- Fold the top edge over the rim. Brush glue around the inside of the rim. Fold the extra 3/4 in (2 cm) of fabric to the inside, working around the can a little at a time and pressing small pleats flat where the fabric gathers. Hold it with clips while the glue sets.
- Add the twine and the felt base. Wrap twine around the can near the top two or three times and tie it at the back seam, or glue on a band of ribbon. Trace the bottom of the can on felt, cut the circle just inside the line and glue it under the base. The felt covers the metal and the lower raw edge of the seam.
Leave the holder to dry for as long as the glue’s label says before putting anything in it.
Tip
If the bottom raw edge of the fabric frays, run a second band of twine or ribbon around the base to cover it.
Make a Set of Three
Three cans of different heights group into a desk organizer: the tall one for rulers and long brushes, the medium for pencils and pens, the short one for clips and erasers. Choose fabrics that share a color and use the same twine on all three so they read as a set. For a different texture on the same desk, a painted terracotta pot in a matching color can hold pens instead of a plant.
If Something Goes Wrong
- Wrinkles or bubbles: lift the fabric while the glue is still wet and smooth it down again from the middle outward.
- A gap at the seam: the circumference was measured too tight. Cover the gap with a strip of ribbon glued down the back.
- The rim fold will not stay down: thick fabric springs back. Snip the fold allowance every 1 in (2.5 cm), stopping short of the rim, so it overlaps flat.
Giving It
A holder can be given empty or filled with a few new pencils. Leftover fabric from the same piece can be used for fabric button magnets to go with it. Because the shape is rigid, a box or a gift bag works better than paper wrapped around the can; see the guide to wrapping a handmade gift for options. Add a note that the cover is glued fabric, so it should be kept dry and wiped rather than soaked.
Frequently asked questions
How much fabric is needed to cover a tin can?
Measure the can's height and the distance around it. Cut the fabric 1 in (2.5 cm) longer than the circumference, for a turned-under edge and an overlap, and 3/4 in (2 cm) taller than the height, for the fold over the rim. A medium can usually needs a piece smaller than a sheet of letter paper.
What should be done about a sharp can rim?
Check the rim with the back of a spoon rather than a finger. Press small burrs flat and cover the rim with a strip of strong cloth tape before adding fabric. If the edge is jagged or cannot be covered completely, do not use that can.
Can the fabric be sewn instead of glued?
The cover in this project is glued directly to the can, which keeps it smooth and stops it from slipping. A sewn sleeve is possible but has to be fitted closely to the can, and it still needs glue or a tight fit at the rim to stay in place.