Felt Leaf Garland: A Fall Decoration to Give
Cut felt leaves from three paper templates, stitch a centre vein on each and fasten them along twine for a garland about 5 ft (1.5 m) long.

Tutorial at a glance
Materials
- Craft felt in four or five fall colors
- Paper and pencil for templates
- Small sharp scissors
- Pins
- Six-strand embroidery floss
- Embroidery needle
- Twine, about 7 ft (2.1 m)
- Cardstock for packing
A felt leaf garland is a string of cut felt leaves fastened along a length of twine, each leaf with a stitched centre vein. Made about 5 ft (1.5 m) long, it spans a mantel shelf, a bookcase or a doorway, and it folds down small enough to give in a flat envelope.
The project uses three leaf shapes, four or five colors of craft felt and one or two hand stitches. Felt does not fray, so the leaves need no hemming: a cut edge is a finished edge. Most of the work is cutting, and the stitching doubles as shaping.
What You Need
- Craft felt in fall colors such as rust, mustard, deep red, brown and olive green
- Plain paper and a pencil for templates
- Small sharp scissors, plus paper scissors for the templates
- Pins
- Six-strand embroidery floss in cream or a contrasting color, and a needle with an eye large enough for it
- Twine, about 7 ft (2.1 m) for a 5 ft (1.5 m) garland
- A piece of cardstock or thin cardboard for packing
Wool-blend felt cuts with a crisper edge than thin acrylic craft felt, but either works. Avoid very thin felt for the lobed shapes, because narrow lobes flop.
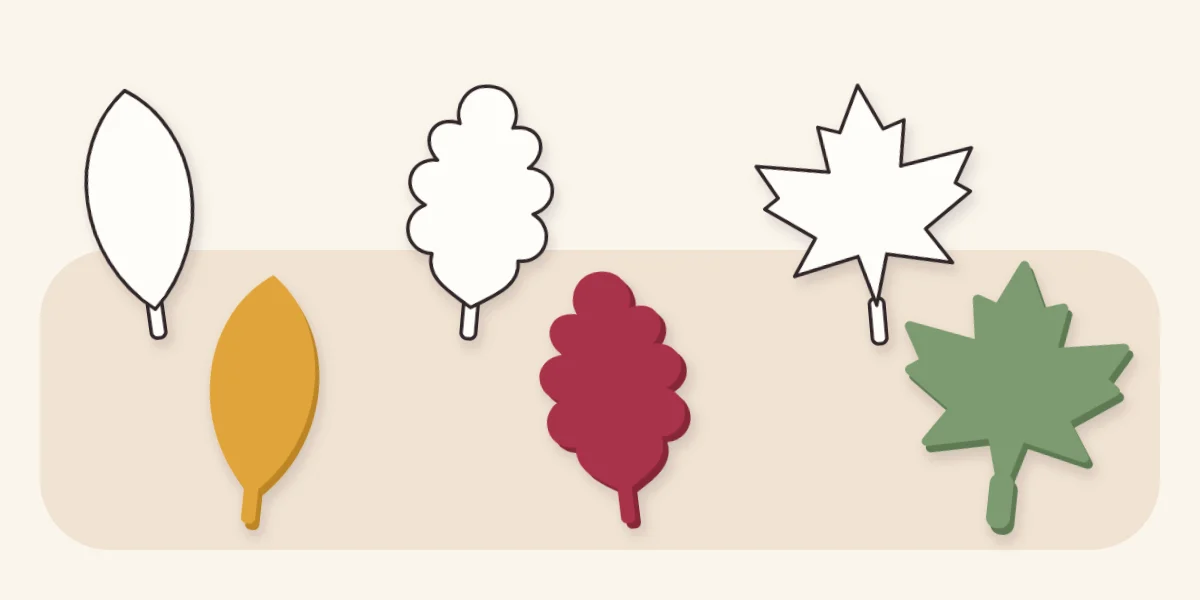
The Three Leaf Templates
Draw each template on paper about 3 in (7.5 cm) long, then add a stem about 3/4 in (2 cm) long and 1/4 in (6 mm) wide at the base. The stem is longer than it looks on a real leaf because it folds over the twine later.
- Oval leaf. Fold the paper in half lengthwise and draw half a pointed oval against the fold. Cutting through both layers gives a symmetrical leaf.
- Oak-style leaf. Start from the same folded half oval, then redraw the outer edge as three or four rounded bumps with shallow dips between them.
- Maple-style leaf. Draw a simplified five-point shape: one point at the top, two angled out at the sides, two shorter ones near the base. Keep the notches between points shallow and wide. Deep, narrow notches are hard to cut in felt and tear easily.
Pin a template to the felt and cut around it, or trace it with a pencil on the side that will be the back. Turn the felt, not the scissors, on the curves. Cut each shape in several colors.
How Many Leaves to Cut
Leaves spaced about 4 in (10 cm) apart, measured from stem to stem, hang without crowding. The twine is cut about 2 ft (60 cm) longer than the leafy section, which leaves a tail of about 12 in (30 cm) at each end for tying.
| Leafy section | Leaves | Twine to cut |
|---|---|---|
| 3 ft (0.9 m) | 9 | 5 ft (1.5 m) |
| 5 ft (1.5 m) | 15 | 7 ft (2.1 m) |
| 7 ft (2.1 m) | 21 | 9 ft (2.7 m) |
For the 5 ft version, cut five of each shape. Lay all fifteen out in a row and shuffle them until no two neighbors share both shape and color.
Stitch the Veins and Attach the Leaves
Use two or three strands of floss, cut about 18 in (45 cm) long. If backstitch is new to you, the guide to four hand-sewing stitches shows the thread path.
- Knot the floss and bring the needle up from the back at the base of the leaf, just above the stem.
- Work a line of backstitch straight up the centre, stopping about 1/4 in (6 mm) short of the tip. Running stitch also works and gives a dashed vein. On the maple-style leaf, add a short side vein into each side point if you like.
- Pull the stitching slightly snug before fastening off on the back. The gentle tension makes the leaf cup along its centre, so it reads as a leaf instead of a flat cut-out. Pull too hard and it puckers; ease the stitches back out with your fingernail.
- Mark the twine. Measure 12 in (30 cm) from one end and tie a loose slip of thread there, then mark every 4 in (10 cm) with a pencil dot.
- Lay the first leaf face down with its stem across the twine at the first mark. Fold the end of the stem over the twine and down onto the back of the leaf.
- Hold the fold with two small stitches through the stem and the leaf back, placed just below the twine, without piercing the twine itself. The leaf can then slide a little for final spacing. Fasten off and repeat for each leaf, keeping every leaf facing the same way.

Tip
If you would rather have fixed spacing, catch a few fibers of the twine in one of the two stitches. The leaf then stays exactly where it was placed.
Common Problems
- Leaves spin and show their backs. The stem loop is too loose. Place the two stitches closer to the twine so the loop grips it.
- Ragged edges. The scissors are dull or too large. Use small, sharp blades and long, smooth cuts rather than many short snips.
- Stems tear at the fold. They were cut too narrow. Keep them at least 1/4 in (6 mm) wide, and recut that leaf.
- Pencil marks show. Trace on the back, or cut just inside the line.
- The garland sags unevenly. Slide the leaves along the twine after hanging until the gaps look even.
Giving It
A loose garland tangles in its own leaves. Cut a piece of cardstock about 4 x 8 in (10 x 20 cm) and snip a small notch in each short end. Catch one twine tail in a notch, wind the garland around the card lengthwise with the leaves lying flat on top of each other, and catch the other tail in the second notch. Slide the card into a paper bag or flat box. The article on wrapping a handmade gift has more on tags and care notes.
Watch out
Felt and twine burn. Add a note saying the garland should hang well away from candles, fireplaces, stoves and hot bulbs, and out of reach of young children and pets.
The same cutting and stitching skills carry straight over to felt Christmas ornaments, and the seasonal gift guide lists other projects that suit fall.
Frequently asked questions
How many felt leaves does a 5 ft garland need?
Fifteen leaves spaced about 4 in (10 cm) apart fill a 5 ft (1.5 m) section. Cut the twine about 7 ft (2.1 m) long so there is a tail at each end for tying. Five leaves of each of the three shapes gives an even mix.
Do felt leaves need hemming or sealing?
No. Felt is made of matted fibers rather than woven threads, so a cut edge does not fray and can be left as it is. Sharp scissors and smooth cuts are what keep the edges looking clean.
Why stitch a vein down each leaf?
The vein is decorative, but it also shapes the leaf. Pulling the stitching slightly snug makes the felt cup along its centre, which gives the flat cut-out some dimension. Backstitch gives a solid line and running stitch gives a dashed one.