Fabric Button Magnets: A Small Gift from Scraps
Gather small circles of scrap fabric over flat discs, cover the backs with felt and glue on a magnet to make a set of fabric button magnets.
Tutorial at a glance
Materials
- Flat wooden discs or plain flat buttons, about 1 in (2.5 cm)
- Scraps of thin woven cotton
- Craft felt for the backs
- Small round craft magnets, about 1/2 in (1.3 cm)
- Strong craft glue suited to fabric and metal
- Sewing thread and a hand needle
- Fabric scissors and a pencil
- Cardstock for a display card
Fabric button magnets are small covered discs with a magnet glued to the back, used to hold notes and lists on a refrigerator or a metal board. Each one takes a circle of fabric about 2 in (5 cm) across, so the project runs entirely on scraps too small for anything else. A set of six in mixed prints uses up offcuts and involves one stitch, the running stitch.
There are two ways to cover the disc. A cover-button kit snaps the fabric into a metal shell. The gather-and-glue method, described in full here, needs only a flat disc, a needle and thread.
Read This First: Magnet Safety
Watch out
Small magnets are dangerous if swallowed, and swallowing more than one can cause serious internal injury. Keep magnets, and the finished pieces, away from children and pets while you work and afterward. Do not give these magnets to a household with small children.
Store loose magnets in a closed container and count them before and after the session. Strong magnets also snap together hard enough to pinch skin and should be kept away from items their packaging warns about.
What You Need
- Flat wooden discs or plain flat buttons, about 1 in (2.5 cm) across, one per magnet
- Scraps of quilting cotton or other thin woven fabric
- Craft felt for the backs
- Small round craft magnets, about 1/2 in (1.3 cm) across
- Strong craft glue suitable for fabric and metal, according to its label
- Sewing thread, doubled, and a hand needle
- Fabric scissors, a pencil and something round to trace
- Cardstock for a display card
Thin cotton gathers neatly; thick fabric bunches into a lump on the back. Most of these items are in the basic kit for paper and fabric projects. If you prefer a cover-button kit, follow the instructions packed with it for cutting and snapping the fabric, remove the wire shank from the back if the kit allows, and skip ahead to the magnet.
Cut the Circles
The fabric circle should be about twice the diameter of the disc. That leaves enough to wrap the edge and gather on the back without piling up in the center. The felt circle is cut slightly smaller than the disc so it does not show from the front.
| Disc | Fabric circle | Felt backing circle |
|---|---|---|
| 3/4 in (2 cm) | 1.5 in (4 cm) | 5/8 in (1.6 cm) |
| 1 in (2.5 cm) | 2 in (5 cm) | 7/8 in (2.2 cm) |
| 1.25 in (3.2 cm) | 2.5 in (6.4 cm) | 1 1/8 in (2.9 cm) |
Trace a bottle cap or a spool of the right size on the wrong side of the fabric and cut on the line. If the print has a motif you want centered, hold the disc over it first and trace around that spot.
Gather the Fabric over the Disc
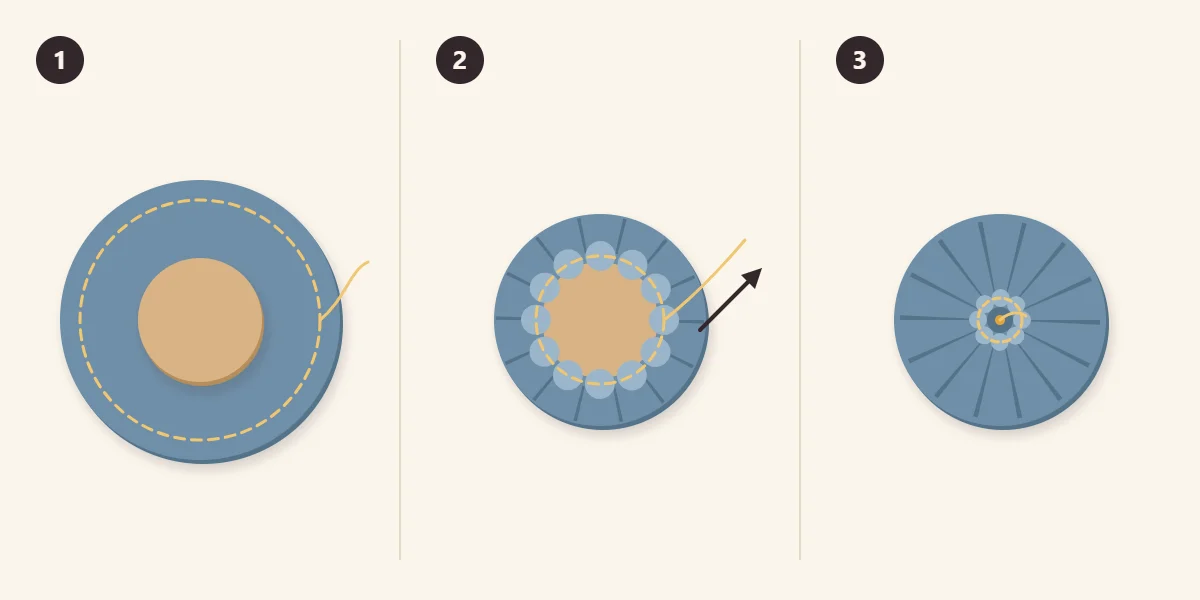
- Stitch around the circle. Thread the needle with doubled thread and knot it. Sew a running stitch all the way around the fabric circle, about 1/8 in (3 mm) from the edge, with stitches about 1/4 in (6 mm) long. Do not cut the thread. Lay the fabric wrong side up and set the disc in the center.
- Pull to gather. Draw the thread up slowly. The edge of the fabric rises and closes over the disc like a small pouch. Check the front and slide the fabric until the print sits where you want it.
- Pull the back tight. Draw the thread until the fabric is taut across the front, then take several stitches back and forth across the gathers to lock them, and knot off.
Short stitches make many small pleats that will not close up tightly; longer stitches make fewer, deeper folds that lie flatter. If the front edge shows little points, the gathers are uneven. Loosen the thread, spread the folds evenly around the back and pull again.
Cover the Back and Glue the Magnet
The gathered back is uneven, and a magnet glued straight onto it has little to grip. A felt circle gives it a flat, clean surface.
Spread glue over the gathers and press the felt circle on top, centered, so it hides the raw edges and the stitches. Then put a small dot of glue in the middle of the felt and press the magnet onto it. Glue soaks into felt, so use enough to bond but not so much that it squeezes out around the magnet.
Check the glue label for the materials it bonds and for how long it needs. Leave the pieces face down and undisturbed until the glue has set fully, as the label directs, before testing them on metal. A magnet pulled early comes away from the felt and stays on the refrigerator door.
Tip
Set drying pieces well apart. Magnets placed close together slide toward each other and drag through the wet glue.

If Something Goes Wrong
- The fabric is loose on the front: the circle was cut too large or the thread was not pulled tight. Unpick, trim the circle slightly and gather again.
- The disc shows through pale fabric: add a second, plain fabric circle underneath as a lining and gather the two as one.
- The magnet does not hold paper: the magnet is too weak for the size of the piece. Test one finished magnet before gluing the rest.
- The magnet has come off: scrape away the old glue, check that the glue is meant for metal, and reglue with fresh adhesive.
Presenting a Set on a Card
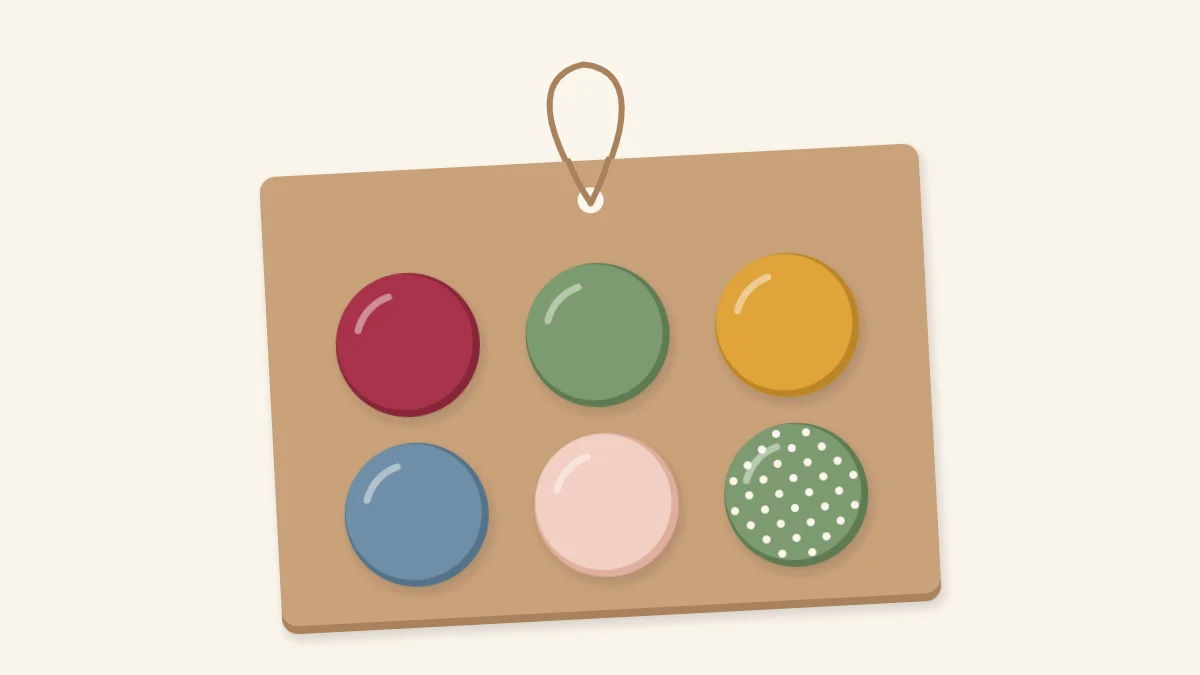
Cut a rectangle of cardstock about 3 x 4.5 in (7.5 x 11.5 cm) for six magnets in two rows of three. The magnets will not grip the card on their own, so hold each one in place with a small loop of removable tape. Punch a hole at the top and add twine.
Write the safety warning on the back of the card: contains small magnets, keep away from children and pets. The guide to wrapping a handmade gift and adding care notes shows how to word small-parts warnings. Scraps from the same fabrics can cover a fabric-covered pencil holder for a matching desk set, or go into small sewn lavender sachets.
Frequently asked questions
How big should the fabric circle be for a covered button magnet?
Cut the fabric circle about twice the diameter of the disc, so a 1 in (2.5 cm) disc takes a 2 in (5 cm) circle. That is enough to wrap the edge and gather on the back. A larger circle piles up into a lump behind the disc.
Is a cover-button kit needed?
A kit gives a very smooth front, but it is optional. A flat wooden disc or a plain flat button can be covered by sewing a running stitch around the fabric circle and pulling it tight over the disc. Either way, a magnet is glued to the back afterward.
Who should not be given button magnets?
Small magnets are dangerous if swallowed, so these are unsuitable for households with small children, and they should be kept away from pets. Include a written warning with the set so the person receiving it knows it contains small magnets.